THE BASICS:
Getting Started:
- Install nHTTPd using your favorite package installer.
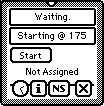
 Establish a TCP/IP connection with nHHTPd by opening
the application and tapping the 'Start' button. Establish a TCP/IP connection with nHHTPd by opening
the application and tapping the 'Start' button.
- The current IP of your machine will be displayed beneath the Start/Stop
buttons. This will be machine name for the URL you will enter in the WWW
Client that will access your server.
- As pages are served, their names will appear in the monitor window,
which is useful for debugging and the hit counter will increment.
- Do not use any other TCP/IP applications (Eudora, Nethopper, etc) while
running this server, as they will corrupt its connection, likely leading
to you needing to reset your Newton device.
- When you ar ready to quit, Tap the 'Stop' button and wait for the connection
to terminate. DO NOT, I REPEAT, DO NOT tap the Close Box before stopping
the connection or you will have to Reset your Newton device. This will
be fixed in a subsequent release of nHTTPd.
Advanced Topics:
The Prefs Slip:
Under the Info Button, you'll find a Prefs slip that has 3 entries.
- Show Slip: This gives you the option to turn on and off the Connect
slip that comes up when you Start a nHTTPd connection. By turning the slip
off, you automatically select the last connection settings you used.
- Hit Sound: Turn this on if you want to hear a tap every time someone
acceses your site. It's a fairly benign sound, so I usually leave it on.
- Edit MOTD: You can set a Message of the Day for nHTTPd accessible via
the <MOTD> SSI tag. Big time system admins use MOTD's and so can
you!
The Iconify Button:
As much as I have tried to strip down the size of nHTTPd, let's face
it. It take sup room. On a MP130, it's a veritable hog. So, I added the
NS button which hides the active server and creates an Auxillary
button in your background application. When you maximize the app, the button
disappears. |
 Establish a TCP/IP connection with nHHTPd by opening
the application and tapping the 'Start' button.